Realistic Letterpress Effect Mockup: Adding Tactile Depth
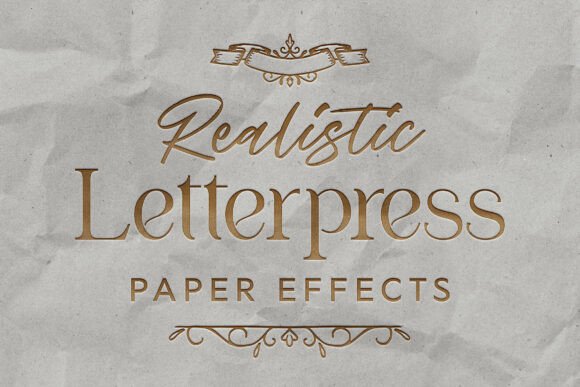
There's a particular satisfaction in running your fingers over a beautifully printed piece of paper, feeling the slight depression where ink has met fiber. That subtle, three-dimensional quality is what separates a standard print from something that feels truly considered and crafted. The Realistic Letterpress Effect Mockup is a high-fidelity Photoshop template designed to replicate that exact tactile experience in the digital realm. It’s not just about making things look old; it’s about capturing the sophisticated, intentional depth of a professional deboss, where crisp impressions sink into premium paper stock with convincing shadow gradients and micro-textures.
The Anatomy of a Convincing Deboss
This mockup operates at a professional resolution of 4500x3000 pixels at 300 DPI, which is essential for capturing the fine details that sell the effect. We’re talking about the subtle grain of a heavy cotton paper, the way light catches the very edge of a pressed line, and the soft, realistic shadow that pools inside the grooves. The personality of this effect is one of "quiet luxury." It doesn’t shout for attention with flashy colors or complex gradients. Instead, it communicates value through material honesty and precise craftsmanship. It’s the visual equivalent of a heavyweight cotton business card or a meticulously embossed book cover.
Technically, the asset is built for efficiency and non-destructive workflow. The core of the file is a layered PSD with a Smart Object system. This means you can take a clean vector logo, a piece of minimalist typography, or a custom emblem, place it into the designated Smart Object layer, and the entire realistic effect—complete with lighting, texture, and depth—is applied instantly. The template includes nine different paper textures and three crumpled paper overlays, allowing you to customize the base surface to match your project’s tone, whether it’s pristine and elegant or has a touch of vintage character.
Where This Effect Truly Shines
Understanding where to use the Realistic Letterpress Effect Mockup is about matching its inherent style to your project's goals. This isn't a one-size-fits-all filter; it's a specific tool for creating a specific mood. Its strength lies in projects where perceived quality, heritage, and meticulous detail are paramount.
- Luxury Branding & Identity: This is its home turf. Presenting a new logo for a boutique hotel, a jewelry line, a high-end studio, or a premium spirits brand? Applying this effect to the logo presentation instantly communicates a sense of permanence, tradition, and tactile quality. It tells the client, "Your brand will feel substantial and crafted."
- Editorial & Publishing Design: For book covers, especially in genres like literary fiction, memoirs, or premium non-fiction, this effect can create a striking and sophisticated title treatment. It adds a layer of literary gravitas. It’s also perfect for magazine mastheads or chapter headings in digital publications that aim for a high-end aesthetic.
- Product Packaging & Labels: Think artisanal goods, craft beverages, or luxury skincare. A debossed label effect on a mockup can help visualize the final product with incredible accuracy, showing stakeholders exactly how the design will interact with the physical material of the bottle or box.
- High-Value Marketing Collateral: While digital-first, this effect excels in mockups for print materials. Create realistic previews of business cards, letterheads, or invitation suites. A wedding stationer, for example, can use this to show clients how their monogram will look with a blind deboss, setting clear expectations and showcasing expertise.
On the other hand, it might not be the best fit for projects requiring a playful, casual, or overly technological vibe. Its strength is in restraint and subtlety, so using it for a children’s party flyer or a gaming startup’s vibrant social media graphics might feel incongruous. Always consider the audience’s expectations and the project’s core message.
Practical Guidance for Implementation
Integrating this mockup into your workflow is straightforward, but a few best practices will ensure you get the most out of it. First, start with the right source artwork. The effect works best with clean vector graphics or high-resolution typography. Complex gradients or photographic elements won’t translate well into a deboss. Think in terms of solid shapes and crisp lines.
Next, consider your font pairing and typographic hierarchy. A letterpress effect adds its own layer of visual weight. If you’re using it for a headline, pair it with a simpler, clean sans serif font for body text to maintain readability and contrast. The mockup itself doesn’t change the typeface, but it does change how that typeface is perceived. A delicate script font will gain a new sense of substance, while a bold serif font will feel even more authoritative.
Experiment with the nine included paper textures. A smooth, bright white stock conveys modern elegance, while a textured, off-white or cream paper enhances a vintage or organic feel. The crumpled overlays should be used sparingly and intentionally—perhaps for a specific artistic project or to add a touch of distressed character to a brand that values authenticity over perfection.
Finally, always zoom in to 100% and inspect the details. Check the shadow gradients within the debossed areas and the crispness of the edges. This attention to detail is what separates a professional presentation from an amateur one. The goal is to create a design asset that not only looks beautiful but also accurately simulates a physical production technique, helping you and your clients make informed decisions about brand identity and print design. It’s a powerful tool for adding a layer of unspoken value and sophistication to your digital portfolio.